

How do breadboards work?
Before you can answer the question how do breadboards work, you need to know exactly what a breadboard is. Firstly, there are various types of breadboards that I’ve covered here. One type has become the main one we use.
What is a breadboard?
A breadboard is a device for building electronic circuits. How do breadboards work exactly?
A breadboard is a plastic matrix of holes that are interconnected with metal strips underneath the surface. In a row each five pins is connected together, these are usually labelled a-e. Then there is a break in the middle and the next five pins are connected together and usually labelled f-j. These identical rows run down the board and are usually labelled 1-63. The holes are spaced 0.1 inch apart, the same as for DIL ICs.
A typical breadboard

Running down the side are four bus bars. Two on the right and two on the left. Sometimes these are coloured red and blue to aid in polarity as these are almost always used to supply the power to the circuit.
It’s also worth noting that on some breadboards there is a break in the middle of each which you need to bridge if you want continuous power all the way along.
The picture below shows a breadboard with which holes are connected shown in yellow.

How do breadboards work – building circuits quickly
The beauty of this device is that it is a solderless method of construction and therefore very quick and easy.
Beginners can learn to use breadboards in a matter of minutes as there are very few techniques to master and you can have simple circuits up and running in a few minutes. It’s like Lego for electronics.
Electronic components are inserted into the board and linked with other components and wires where necessary to build the required circuit. It is a temporary method of construction and although used by beginners they are also very useful for more experienced constructors to try out stuff. There are various ways that you can lay out a circuit on the breadboard that I’ve covered here.
Also, have a look at my article on transferring a circuit from a diagram to a breadboard to see how I do it.
You can take a finished circuit and then reconstruct it on a Vero board for a more permanent solution after you have verified the circuit does what you want. This also frees up the breadboard again.
If you are looking to transfer a solderless breadboard circuit to make it more permanent be sure to check out my guide, Solderless Breadboard to PCB for some helpful information and tips.
Information
The modern plastic breadboard in use today, with .1-inch spacing holes was patented in 1971 by Ronald Portugal.
Breadboards with electronic components
When using a breadboard ensure that the component leads are clean. If they aren’t, not only could you get a bad or intermittent connection but the dirt can get inside the metal strips of the breadboard. Also, be careful if the components are supplied on a strip with tape.
Cut them off with side cutters instead of pulling them off so you don’t leave any sticky residue on them which will transfer to the internal strip of the breadboard causing all sorts of problems.
When using wires to connect to the breadboard you should use single-core cable, not the multicore twisted variety. Individual strands can break off and get into the breadboard. It’s also a lot easier to insert the solid core wires. Check out my guide on breadboard wires.
If you’re making your own connecting wires the best thickness is 22AWG. If the wire is too thin it will bend as you try to push it into the breadboard. Wire that’s too thick can damage the internal connections of the breadboard.
When you strip back the cable you should expose around 5mm as that’s about how deep the contact area is. It will give you the best hold in the socket as it can be pushed all the way down to the bottom. You don’t want a connection only just in as it’s easy to dislodge it as more connections are added. Trying to find where a wire has come from is no fun at all.
Pre-made connecting wires
If you don’t want to mess around with making interconnecting wires, you can buy packs, especially for breadboards. They have plug connections on each end. They come in various colours and lengths and are reusable. Also, when you see how cheap they are you’ll probably wonder why you bothered making them in the first place.
Make your own links
If you are making a particularly complicated circuit and you have lots of interconnections you may be better off making your own links out of single-core wire.
This is because you can make them to exactly the right length. There will usually be several short straight connections that suit doing this and it does make a tidier finished circuit. As you can see from the picture below it makes connections easier to follow.

For shorter links, you can use bare tinned copper wire. I’ve made a form to bend the wire around. For more information about this and lots of other tips have a look at my breadboard tips article.
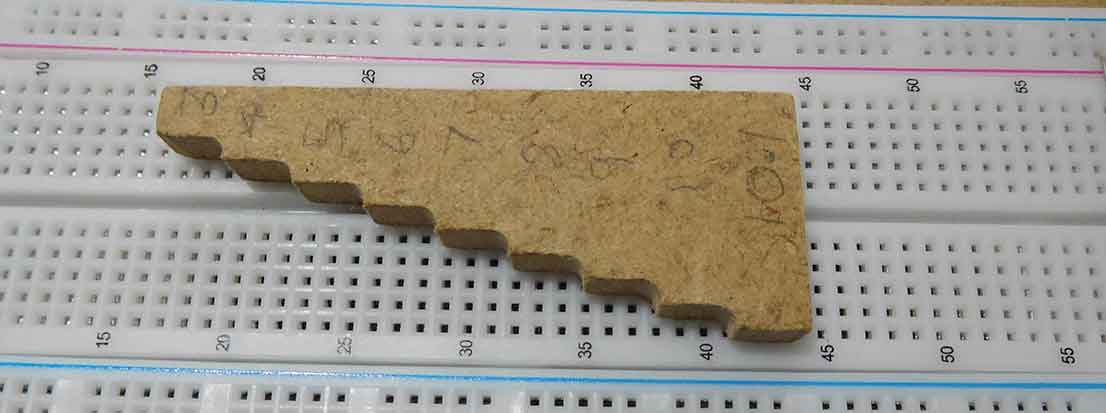
I’ve used my CNC machine to cut the shape out. It’s 6 mm thick so if you bend the tinned copper wire around the right number and trim it flush it’s the perfect size and depth for a breadboard. It has all the increments from .3 inch to 1.1 inch and speeds up construction considerably.
When I have finished with a circuit, I take it to pieces and keep the wire links in a sectioned plastic box so all my links are easy to reuse. This also speeds up building circuits.
How do breadboards work – Testing integrated circuits
A breadboard is also a quick method for testing integrated circuits.

The picture above is from my testing op amps article. I’ve connected an op-amp on a breadboard and I’m putting a square wave into it from my signal generator and checking it at the op-amp output with my bargain £20 DSO 138 oscilloscope kit.

The picture above is from my article about testing 555 timers. One of the most common, and the first IC I bought.
Information
The 555 timer contains 26 transistors. Imagine trying to fit all of those in your layout
Breadboard layout software
I frequently use breadboard design software. Fritzing is my current favourite and it’s useful for printing off circuits and layouts. Before this, I used to do it manually with a pen and paper but the software makes my diagrams a lot neater!

The image above shows a breadboard layout of the envelope generator from my breadboard synthesiser project, layout out in Fritzing.
How do breadboards work – final thoughts and where to go next
That is a basic answer to the question of how do breadboards work. If you are looking for more information you can go on to the next part. This is more specifically about practically building circuits on breadboards from circuit diagrams. It is called how to build a circuit on a breadboard.
Now you know how breadboards work, you might want to vet some experience and build a circuit. If so be sure to have a look at my how to build some simple circuits on a breadboard. this has simple instructions and diagrams for you to follow.
If you are looking for a large project to build on a breadboard have a look at my article about how to build a complete synthesiser on breadboards. This shows you how you can build a complete synthesizer on breadboards and has full instructions and diagrams.

Also, If you are looking to buy a breadboard for experimenting, look at my guide on Where to buy breadboards.
For a complete breadboard kit with components, connectors and instructions to build complete projects, look at my article, Best Breadboard Kits Buyers Guide. This will help you decide the most suitable kit for your needs.
Finally, check out my post, Breadboards – the complete guide for everything breadboard-related.
Oh and one last thing, if you use breadboards because you can’t solder, you really are missing out. Learning to solder is easy and it’s not expensive to get the tools and materials you need.

“Hi, I’m Graham Moore and I’ve been building electronic projects since I was 12. I had a fascination for old radios and taking them to pieces but when my Nan bought me an electric soldering iron, I realised with a few components I could build stuff.
Learning to solder opened up many doors for me as electronics also became a career. I hope you get as much from it as i did”.


