

Electronic projects for beginners
Electronic projects for beginners can be split into two different categories. Soldering and non-soldering.
When I first became fascinated by electronics, it was the non-soldering ones that got me started. At this point, I must point out that soldering is very easy to do. All you need is a soldering iron and a read of my learning how-to solder guide.
I put off soldering because I couldn’t do it. I didn’t realise just how easy it was. Anyway back to the beginning and the non-soldering electronic projects for beginners.
Don’t use the mains supply
This really should go without saying but you will make mistakes.
Don’t make them with mains because it can kill you.
Sometimes a little knowledgable can be a dangerous thing. I know someone who blew up their hi-fi.
He knew a little about electronics (very little) and someone told him that if you wired a light bulb to the mains and across the loudspeaker it would flash the light in time to the music.
Honestly, this really happened. He was lucky he only blew up the hi-fi!
Non-soldering electronic projects for beginners
I’m going to split this section into two again.
To build an electronic project you connect electronic components in various ways. There are different ways you can connect these components together. You can make electronic projects in a DIY way. One of the first ways I built stuff was by following the methods in these two books I found in the library. This was the way we used to get information before the internet.

This method uses a wooden board and wood screws and screw cups. The idea is that the screw cup is metal and therefore a conductor or connector.
You simply trap the component lead or a wire under the cup and tighten the screw to hold it there. While basic it does work and you can buy whatever components you want to build anything you want to.
The problem is that it’s only for basic circuits and as soon as you start to get bigger projects you realise that it would be far easier just to learn how to solder.
Identify the components
This is one of the first things you’ll need to be able to do.

I used to get some of my components from old radios by de-soldering them. I’ve written a guide to de-soldering that has plenty of tips to help a beginner and if you solder you’ll have to de-solder something at some point.
You’ll learn how to identify components with experience. The basic ones are pretty straightforward.
I’ve covered identifying electronic components in depth here with plenty of pictures.
Now and again you might get stumped by one. If you have a component tester like this it will identify lots of components. These are invaluable for beginners but I still use mine all the time.
You can get these in kit form as well. Build the kit, gain experience and have a useful device for when you build your next project!

This component tester will also tell you the values of components. Even if you know, it’s a good way to double-check.
You can learn how to read a resistor colour code here. It will save you time in the long run. You should also learn the capacitor value code for the same reasons.
No solder electronic kits
When you realise that you just need to connect components together, you can see how different methods have become popular.
As a child, this was the first encounter I had with building electronic projects.
The advantages are that it’s quick to do. I was able to quickly and easily build all of the projects in the book. I actually built a few of them more than once. The radio was always one of my favourites.
The major disadvantage of these types of kits is that you can’t really expand on them and when you’ve built all of the projects there’s not much else you can do.

I’ve not got this kit anymore but the picture above shows something similar to what I had.
Breadboards
In the last section, I mentioned a DIY method of building your own circuits on a piece of wood.
This is how some circuits were actually built years ago. Literally on a breadboard.
The term breadboard today usually refers to a plastic device. This device contains strips of metal under the plastic. These are sprung so if you put a component lead into one of them it holds it in place. If you put another in the same strip it will not only be held in place but also electrically connected to the other.
Click here for some simple breadboard projects to get you started.

These are laid in out such a manner that they are constructed to hold dual in-line integrated circuits. Lots of modern circuits have a least one of these devices so it makes perfect sense.
You can buy breadboards individually or you can get complete breadboard kits covered in my buyer guide here.
Breadboard disadvantages
The disadvantage of building circuits on a breadboard is that it takes a little longer. It can also be prone to mistakes because it’s easy to put a lead in the wrong hole. There are so many holes?
Don’t worry, there are ways you can minimise mistakes and I’ve covered several of these in my breadboard guide.
Breadboard advantages
There are some huge advantages to the breadboard method of electronic construction.
The first is that it’s unlimited. You can build anything you want on a breadboard. Even some very large projects by clipping more than one breadboard together. I’ve built a complete synthesiser on a breadboard so I know it can be done.

You don’t have to be that ambitious though’ you can build something with a handful of cheap components. Flashing light project. There are plenty of websites that have breadboard layouts for you to follow. You can build circuits on breadboards even if there’s no “picture” for you to follow.
Check out my guide to laying out a circuit on a breadboard and you’ll learn how to take any circuit and turn it into a breadboard layout.
Once you know how to build a circuit on a breadboard learning to solder is the next logical step. You can make your breadboard layouts permanent. You can get boards to solder that are just a copy of the breadboard and you just put the components in the same place.
Another thing with breadboards is that even if you learn to solder you’ll probably still use a breadboard.
I still use breadboards to try out ideas and circuits quickly. It’s an excellent way to prototype as you can add stuff and change components values till you get the circuit doing exactly what you want.
People with far more knowledge than me still use breadboards to design circuits.
You can also get software to help you lay out breadboard circuits. This saves all those scruffy scraps of paper I used to produce!

Electronic projects for beginners – Soldering electronic kits
If you know how to solder them you can easily build some of these kits. If you don’t know how to solder then have a look at my how-to-solder guide for tips to quickly become an expert.
Once you can solder the world is your oyster. It was for me as it led to a career in electronics. Even if it hadn’t it would still have been worthwhile for all the stuff I’ve built over the years.
I think soldering kits are the natural progression once you build the projects from the non-soldering kits. Flashing lights are all well and good and I’m not dismissing them as I can still remember how good it felt to build them when I started. Sooner or later though you’ll want to go a bit further.
There are plenty of cheap electronic soldering kits on various platforms. Many of these will cost you less than ten pounds. The PCBs almost always have screen printing indicating where the components go and this makes construction easier and mistakes less common.
Some of these kits not only give you the thrill of building something but as they are permanent you can use them as long as you want.
This is especially easy with some of the useful ones. I built one of those dice kits ages ago and it still gets used now. I’ve got a guide on beginners’ electronics soldering projects so have a look at that if that the area you’re are interested in.
Tip – Buy a decent soldering iron stand
Throw away the metal flat-folded thing you get with your soldering iron and get a proper stand. Antex makes a great one for both of the models here. It’s sturdy and won’t fall over and your iron won’t get pulled out of it like the flat metal ones.
A soldering iron gets very hot and it can cause not only damage to you but your surroundings. Believe me, you won’t be Mr popular if your soldering iron has burnt a table or carpet. Get a proper stand, you’ll thank me later.
Electronic projects for beginners – The DSO 138 Oscilloscope kit
Here’s an idea for a soldering kit. Why not build an oscilloscope? The picture below shows an easy-to-build oscilloscope kit I built a couple of years ago. It’s called the DSO 138 oscilloscope kit, if you’re looking for it.
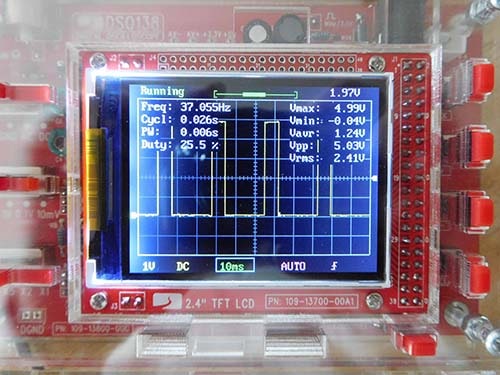
It only cost about £20 and it really works. It won’t outperform a £300 oscilloscope but it can still do loads of day-to-day stuff that an oscilloscope can do especially at audio frequencies.
If you only starting out you may not yet realise how useful an oscilloscope will be. I’ll tell you now that it will let you see and check things that no other gear such as a multimeter will. This one is as good as any of the similar ones you buy. I had another DSO oscilloscope that I bought for a lot more than this.
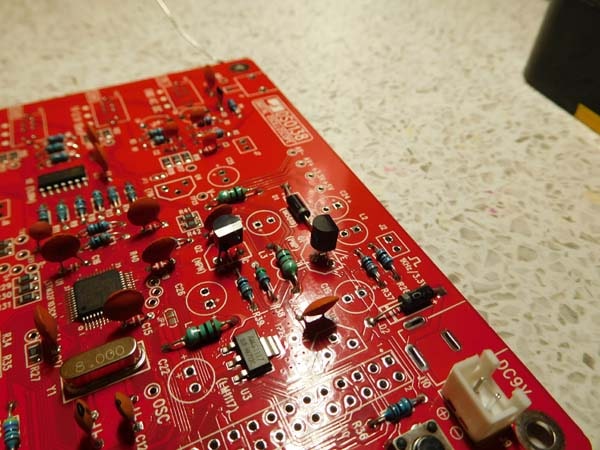
Don’t worry if you can see the SMD soldering. These are all pre-soldered. you only have to solder the through-hole components.

The picture above shows the completed kit in the optional case.
For more information on oscilloscopes have a look at my articles about how you use an oscilloscope and how an oscilloscope works. These both cover the basics to get you going in an easy-to-understand way.
Getting a bit more advanced
Once you know how to solder and you’ve built a few beginner projects you no doubt look at some bigger and more advanced projects.
If you know what the components are. Learn the basics of electronic construction and soldering there is nothing to stop you from building something bigger. After all, it’s just a bigger board with more components. It’s all just a question of scale.

Take your time and double-check and there’s no reason you can’t build a bigger project.
You can build things that you can’t buy off the shelf. This has particularly been the case for me.
I like building electronic music projects. Many of these things can’t be bought. There are literally hundreds of electronic music modular devices that you can build from kits. I’ve built loads of them over the years. You can also modify them to do exactly what you want or add things to them once you gain more knowledge.
Some of these kits even have different options that you can build depending on exactly how you want them to function. I’ve built complete synthesisers like the Mutable Instruments Shruthi. You can’t get them ready-built but you can get a kit and end up with an extremely good analogue/digital synthesiser. You can build these with different filters just to make them even more versatile.
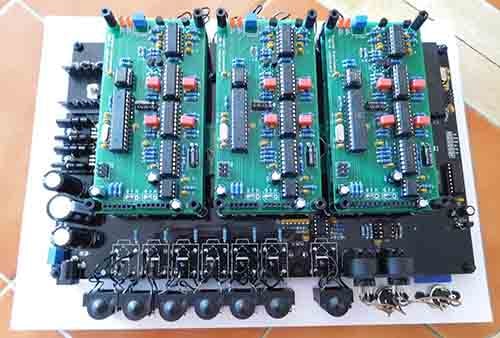
With a little practice, you can build much larger projects. The picture above shows a Mutable Instruments “Ambika” polyphonic synthesiser that I built a couple of years ago.
Seven PCBs soldered and plugged together.
Electronic projects for beginners – Strip-boards
It wouldn’t be a complete guide if I didn’t mention stripboards.
These were the first boards I used to solder projects on. I still use them now. They are a very quick and easy way to build a circuit. Although a lot of more experienced builders look down on them I didn’t.

You can get around a lot of the things that people don’t like about them. Check out my stripboard tips guide and I’ll show you lots of things to help.
Also, have a look at my complete guide to stripboards. They come in all shapes and sizes and make it easy to build circuits quickly.
Electronic projects for beginners – Final thoughts
If you want to get into building electronic circuits there are various ways and methods you can do it.
The idea behind this guide is to help you find the best one for your circumstances. If you are considering getting into building electronic projects I would definitely advise you to do it. There’s nothing else much like it.
Not only will you learn, you can build stuff you can’t buy. Then you can modify it to do exactly what you want. There’s always something else to build’ you never get to the end. You can even make your own printed circuit boards if you want there are various methods to do this.
Tip – Learn how to solder properly
I’m still surprised by how many people still muddle by without learning the proper way to solder.
Do it properly and you’ll save so much time and trouble.
If you’ve just learned how to solder there’s nothing like a kit to get you going in the right direction. I can definitely recommend the DSO 138 oscilloscope kit. It’s easy to build an you will then have something that is really useful afterwards.

“Hi, I’m Graham Moore and I’ve been building electronic projects since I was 12. I had a fascination for old radios and taking them to pieces but when my Nan bought me an electric soldering iron, I realised with a few components I could build stuff.
Learning to solder opened up many doors for me as electronics also became a career. I hope you get as much from it as i did”.