

Stripboard ATtiny programmer
This article will show you how to build a Stripboard ATtiny programmer that works with the USBasp.
There are lots of beginners stripboard projects on the internet but while most of them can be described as entertaining and educational, as you are learning, not many of them are really that useful.
Once you built this project, have a look at what you can build once you can program a microcontroller. I’ve built a MIDI (Musical Instrument Digital Interface) to CV converter to connect my Breadboard synthesiser to the rest of my equipment.
This project is a stripboard ATtiny programmer to work with the USBasp, and while still easy to build will also prove to be useful. I still use it now because it provides a function that I need.
If you have even the slightest interest in things stripboard-related then check out my post, Stripboards – the complete guide. I’m sure you’ll pick up at least one tip to either save you time or money!
As this is a beginner’s project I’m trying to cover all the small details that sometimes experienced builders take for granted but sometimes the little easy things baffle a beginner. I know I’ve been in that position a lot while I was learning.

Tip – Always use IC sockets
The cost is minuscule compared to the ICs and there’s no easier way to check if an IC is working.
You just unplug it from a socket and plug it into another one.
What will you need to build a stripboard ATtiny programmer
As it’s an item to connect to a USBasp you’re going to need the USBasp. Along with the 10-pin to 6-pin adapter.
A small piece of stripboard with at least 10 strips by 15 holes. If you are a beginner and you have a larger stripboard I would suggest you cut it down to this size as it can cause you to miss count sometimes with a larger board.
For some help and tips in cutting stripboard or veroboard check out my article How to cut veroboard.
If you need to buy some stripboard check out my Veroboard and Stripboard resources, tools and stuff. For the best places to buy stripboard and a few bargains.
You will also need a sharp knife for cutting tracks.
Some wire for links. You can use insulated wire and strip it but I prefer tinned copper wire for these short links. Again if you are a beginner and need some help and tips for stripping wire you can read my article How to strip a wire here.
You will also need an 8-pin DIL socket and a 6-pin DIL header. A 390 Ohm resistor and an LED.
Stripboard ATtiny programmer – Start by cutting the tracks
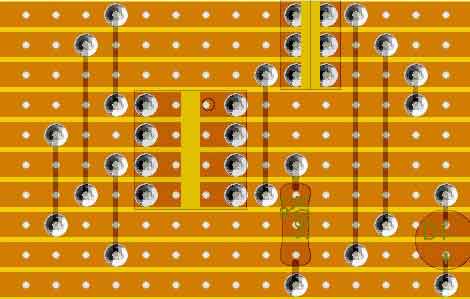
I always find it easier to cut the tracks on the back of the stripboard before I start to do any soldering. Probably the hardest part of this project is cutting the tracks because when you use a 6-pin DIL header on the stripboard you have to cut between two holes and still leave each hole on either side solder-able.
The basic technique of cutting tracks with a track cutter removes the track around a hole but we can’t do that here. If you want some help and tips check out my article:
As it is a simple project you can turn the board over and carefully count. On more complex circuits cutting the wrong track or the wrong place can be a real problem as can soldering a component in the wrong hole. We’ve all done it let’s face it it’s difficult because there’s just a grid of holes.
Stripboard ATtiny programmer – Some helpful software
If you are building more complex circuits you can help yourself tremendously by using some software. I use Lochmaster 4, initially, I used it to help me plan out circuits and it is great for that but a feature I never even thought about has turned out to be one of the most useful and that is the ability to print out a component layout exactly to scale.
You can print a layout in black and white to exactly the right size and stick it over the stripboard.
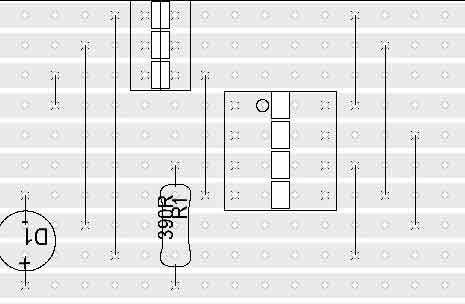
When you build a PCB they nearly always have a component layout screen printed on the component side of the PCB. This is very useful when you come to build it however there are only so many holes in a PCB so it is not that hard to work out where the components go anyway. With a stripboard, you are just presented with a blank grid of holes.
The printout for a stripboard construction is about ten times more helpful. It helps you to almost eradicate the almost inevitable mistakes on a complicated and large board.
I built 4 identical large stripboards for a project and all four worked the first time without a problem. I should add this was completely down to having a component overlay stuck on top of the board. Not my building skills.

Construction of the stripboard ATtiny programmer
So back to this layout. If you want to use that software and do a print out then do so. I’ll assume that for this one we are doing it without. First, turn the board over and carefully count and cut the tracks. One tip I can give you here is to get a black marker pen and mark them before you cut. Then double-check.
Then carefully cut the tracks. I find it easier to make two cuts slightly apart from each other. Then tilt the knife to remove the sliver of copper. You have to use a very sharp Stanley knife or scalpel.
I always use a magnifier for this. It makes it a lot easier to see and you don’t want to leave any bits of copper around too short to other tracks.
When I’ve done this I use my multimeter set to continuity so it beeps if it finds a join. Check that all the tracks are actually electrically cut. Sometimes a tiny bit of copper remains. You obviously don’t want this to happen.
Check adjacent tracks as sometimes you can bend a bit of cut-off track to touch the one next to it. Use your magnifier and multimeter to confirm all is as it should be, then you are ready to move on to the next stage.
Making the links
This is quite simple and can be made even simpler. Just use tinned copper wire as you won’t have any stripping to do. Just cut a small bit and bend it to fit where it needs to be on the stripboard. Then turn the board over and solder it. If you are unsure about soldering check out my article:
Learn how to solder – beginners guide.
Just take your time and make each wire link and solder it on the back. Then turn the board over and trim off the leads as you go.
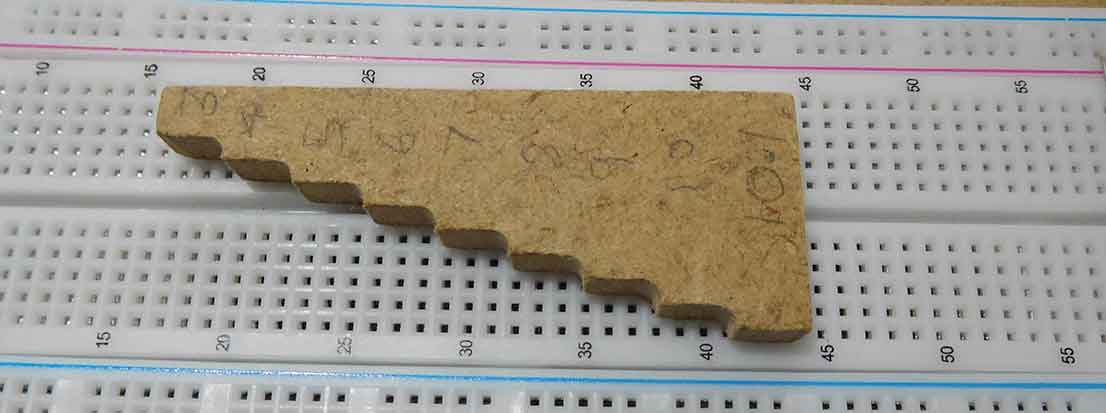
You could make a former like the one shown in the picture above. This is just one of the time-saving tips in my handy guide on Stripboard tips you may not know.
Once you have done all of them next solder in the 8-pin DIL socket. This component is marked with an indentation to mark the top of it and hence pin 1.
While it won’t make any electrical difference it’s good practice to solder them correctly especially as in this project you’ll be removing and inserting an 8-pin DIL IC.
It’s bad enough to have to make sure you correctly plug ICs without having to remember you’ve got to plug it in upside down because the socket is the wrong way.
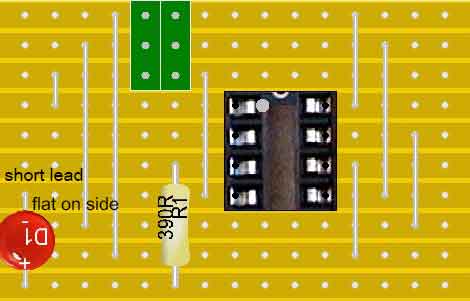
Then solder in the 6-pin DIL. Finally, solder in the resistor and then the LED. The LED needs to be soldered in the correct way round or it won’t light. The shortest lead will also have a flat bit on the plastic case.

Final thoughts on making a stripboard ATtiny programmer
If you’ve done everything correctly you should now have a stripboard ATtiny programmer. The 6-pin DIL connector can be plugged in either way round you may wish to put a red line on the top of the stripboard. This is marked to correspond with the red line on the ribbon cable. To program ATtiny microcontrollers with the USBasp you will need to install some software on your laptop.
I cover all the software installation, setup and programming in another article: Programming an ATtiny85 with a USBasp.

“Hi, I’m Graham Moore and I’ve been building electronic projects since I was 12. I had a fascination for old radios and taking them to pieces but when my Nan bought me an electric soldering iron, I realised with a few components I could build stuff.
Learning to solder opened up many doors for me as electronics also became a career. I hope you get as much from it as i did”.
Stripboard tips

Stripboard tips This article contains all the Stripboard tips I’ve found over the years. Although it’s been around for a long time, stripboard is still a very useful way…
What’s the best stripboard?

Stripboard has been around for a long time and its still manufactured and bought in large quantities. It has, and will still remain hugely useful for electronic hobbyists to build,…
Lochmaster 4.0

Lochmaster 4.0, is it the best stripboard layout software? I have tried a few of the other available stripboard layout designer software packages. There is some very good free software…