


Stripboard ATtiny85 MIDI to CV converter
This stripboard ATtiny85 midi to CV converter is based on a breadboard project. Before you start building it you might want to read that first. The idea for the breadboard project was to build a complete synthesizer on a breadboard. This was inspired by and sounds similar to the Sequential Circuits Pro 1 synthesizer and was based on the Curtis Electromusic CEM but instead, I tried out the AS equivalents.
The breadboard synthesizer project is here if you want to check it out.
After I had built the breadboard synthesizer I didn’t want to just take it to pieces. By transferring the circuits to stripboards I could also implement some of the other ideas. Also, some stuff that I couldn’t fully explore on a breadboard.
The new idea was to end up with something like a modular version of the Sequential Circuits Pro 1 synthesiser. This time I was going to build it on stripboard. As some people may already know I’m a bit of a fan of stripboard and have already written several posts about it. If you are a beginner you can find out how to use stripboard here.
Information
The Sequential Circuits Pro 1 was used for lots of the sounds on the Yazoo – Upstairs at Eric’s album.
Vince Clarke says it is his favourite synthesiser of all time.
Stripboard ATtiny85 MIDI to CV converter changes
The original breadboard project is here. There aren’t a lot of changes apart from the layout which is obviously different from the breadboard layout anyway.
This was built on the stripboard with a break in the middle, this is always good for ICs and if you are careful with your design you won’t need to do any other track cutting. While I think of it, if you’re interested in stripboard design check out my article about stripboard design software for some help and tips.
Obviously, this design could have been made smaller if I had wanted and looking at the design I wonder just how small you could make it if you designed a PCB and used surface mount devices.
Euro rack power compatibility
As you can see from the picture below I’ve used the synthesizer euro rack standard power connections. In the diagram, that’s what the connector is supposed to be. I couldn’t find any better symbols in the software. I’ve used this layout more and more in my circuits.
The first reason is it stops me from connecting up power the wrong way around. Second, it’s always good to be able to unplug the connections so the board can be easily physically removed.
As the sockets have the same voltage on either side you can mount them vertically on the stripboard with the strips running horizontally. This gives you one strip with a negative supply, one with a positive and the three central ones with 0V.
I recently started building stripboard projects in the Eurorack styles. It has quite a few advantages and saves a lot of wiring. Have a look at my guide on building Stripboard Eurorack modules for all the information.
Voltage regulator
This circuit only needs a 5V supply and the original breadboard project used a 7805 regulator which you may have noticed. In this stripboard layout I’ve used a 78L05 as I’ve loads of them and this circuit is the perfect size and current-wise as in total it uses just a few milliamps.
If you use the smaller 78L05 instead of a 7805 make sure you are aware of the different pinouts of the two devices. The ins and outs are switched around.

Stripboard MIDI to CV converter construction
Just follow the diagrams and you shouldn’t go far wrong. Also, if you use the same stripboard as I did there are no tracks to cut. The actual board is a lot longer and you can cut it down and save the rest for something else. If you want some tips on cutting stripboard check out my cutting stripboard post here.
The original project was by Jan Ostman. He is the brains behind this clever way of getting a CV and gate from MIDI with just a few components. He has however stepped back from this and can’t be contacted any more.
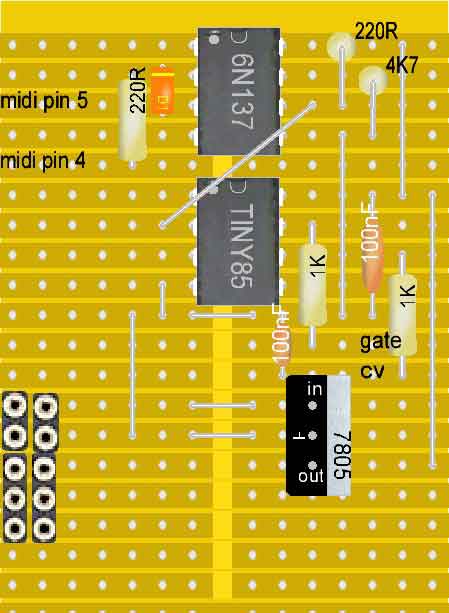
Some of you may have spotted that you can’t get the full range of notes that MIDI supports with only 5V and this is correct.
Even if there is a 5V supply around you are better off using the 5V regulator. This is because the tuning can be affected if you connect it to an existing circuit.
The CV is taken from the pulse width modulated output so that’s why the capacitor is there as well. It will output the notes C2 to C5 which is 0V to 5V. The gate output is 0V going to 5V when a key is pressed.

The layout was done with the Lockmaster stripboard design software. This enables you to do a black-and-white printout and scale it to exactly the correct size.
You can then cut this out and line it up to your stripboard. This overlay will then enable you to put all the components in the correct places.
Programming the ATtiny85
The ATtiny85 has to be programmed and coming from an electronics construction background this was the hardest part for me. Firstly I had to learn about programming the ATtiny85. I’ve documented that in my post programming the ATtiny85 here. If you are a complete beginner like I was it contains just about everything you need to go from knowing nothing to being able to program the required code for this project.
Once you are confident in programming the code that I used is here at the original breadboard project.
Also, don’t be put off programming the ATtiny85. Once you get a know how to do it not only will you be able to program one for this project but you will be able to use them for lots of other projects. They are great fun and really useful. It only took me a few hours over a weekend to start programming.
Final thoughts on the Stripboard MIDI to CV-converter
Obviously, this circuit has a few limitations as a MIDI to CV converter. Also, you may have noticed that there isn’t a preset resistor to calibrate it to a synthesizer voltage-controlled oscillator. You’ll have to calibrate the VCO to the converter if you find it isn’t accurate enough as it stands. There is also the fact that it doesn’t cover the whole range or have any controller outputs as it stands.
It does however have the advantage that for less than ten pounds you can make a tiny (in both respects) MIDI to CV converter that’s perfect for a simple analogue synthesizer.
It’s also great if you want to retrofit an older synthesizer with a simple MIDI note interface especially when you consider its cost and size.
If you have even the slightest interest in things stripboard-related then check out my post, Stripboards – the complete guide. I’m sure you’ll pick up at least one tip to either save you time or money!


“Hi, I’m Graham Moore and I’ve been building electronic projects since I was 12. I had a fascination for old radios and taking them to pieces but when my Nan bought me an electric soldering iron, I realised with a few components I could build stuff.
Learning to solder opened up many doors for me as electronics also became a career. I hope you get as much from it as i did”.
Hide Ads for Premium Members
[quads_disable_ads_form]
555 monostable calculator

555 monostable calculator Download the 555 monostable calculator to easily work out the time from the components. Once you have downloaded the spreadsheet, all you have to do is input…
555 astable calculator

555 astable calculator Click further down the page for a downloadable 555 astable calculator. If you’ve joined this guide from the 555 operating modes page or even if you haven’t,…
555 timer modes

555 timer modes The 555 timer has 3 main modes of operation. These three 555 timer modes are astable, monostable and bistable. You can achieve each of the modes by…
How to test a 555 timer

How to test a 555 timer This guide will show you how to test a 555 timer. I’ve covered testing many types of electronic components before and this tends to…
Capacitor value codes

Capacitor value codes Capacitor value codes are often used to indicate the value of a capacitor. Whereas resistors have usually stuck to a standard colour code (well standard-ish as it…
Lite windows with DAWs

Lite Windows with DAWs I wondered how much performance boost I’d get using Lite Windows with DAWs. The test results were shocking! A few years ago I decided to use…
How to connect Kodi to a network drive

How to connect Kodi to a network drive If you need to know how to connect Kodi to a network drive, it will depend on your particular network drive. I’m…
Can you solder without flux?

Can you solder without flux? The simple answer to can you solder without flux is no. The good news is that if you have got some solder it’s more than…