

Lochmaster 4.0, is it the best stripboard layout software?
I have tried a few of the other available stripboard layout designer software packages. There is some very good free software around and that may be all you need. However, I found Lochmaster 4.0 to be the complete solution for me. It isn’t free but it doesn’t cost a lot either.
You can check out my page on Veroboard and Stripboard resources, tools and stuff here.
If you have even the slightest interest in things stripboard-related then check out my post Stripboards – the complete guide. I’m sure you’ll pick up at least one tip to save you either time or money!
I use Lochmaster 4.0 on Windows 10. I can confirm that it definitely runs on Windows 10. Even though it doesn’t get mentioned in the list of Windows that will run it. It also works on Windows 7.
What do I like about Lochmaster 4.0?
It works in the way I would like it to. By that, I mean sometimes you learn how to use software and you have to learn a way of doing something while all the time thinking why didn’t they do it like this? With Lochmaster 4.0 the person who wrote the software seems to have done it how I would.
You can now buy the software directly from Amazon. Click on the links below.
Make your own board sizes and designs
Logically you start off with the board. You can use any size that you want and there are templates in the library to choose from. For me though the most useful part was being able to design your own boards and save them as templates. Reading about this feature wouldn’t have blown my mind but in practice, it has proven to be a lifesaver.

I got hold of the narrow stripboard that had a break in the middle. It’s a bit like a breadboard layout, and it’s very useful for building circuits with lots of ICs on it. With the software, I was able to quickly knock out the board in the board layout editor.
You can make the size correct and where the copper strips go. The results are shown below.

A stripboard design that I added as a Lochmaster 4.0 template.
I got hold of some prototype boards off the internet. These have power rails running between tracks designed for mounting ICs. I was able to create boards for those so I could then use Lochmaster 4.0 with those as well.
These have proved to be really useful for more complex circuits. Again I’ve shown it below. This is something that I’ve found no other packages could do. Stripboard is now available that’s not just strips of copper. There are better designs to make building circuits easier. You can read more about different types of stripboard here.

The board layout I created for a stripboard I found on Amazon.
Lochmaster 4.0 – Zooming and navigation
I like the way it’s easy to zoom in and out with the mouse wheel. The amount you can zoom in or out is amazing. You can make a large board of 100 holes by 200 strips appear small in the middle of the screen or zoom right in so an 8-pin IC fills the screen. You’re not limited by the software at all for viewing.
You can pull components from the massive library of parts and drop or move them where you need. You can also fully rotate them how you want. Apparently, you can edit components but so far because of what’s available, I haven’t had to do that yet.
Lochmaster 4.0 – Component numbering
Components can be numbered and values associated with them. Resistors and diodes can be mounted vertically. Just as they can in a practical build. For instance, when a resistor has to go between pins 1 and 2 of an IC.
You can copy and paste a component and it will automatically be assigned the next available component number. For instance, if you copy C2 but have used up to C8 the pasted version will become C9.
Lochmaster 4.0 – Links and breaks
Wire links are also easy to place with a special tool and a couple of mouse clicks. Also, soldering points and pins can be added with tools.
Track breaks are easily added with a special tool but what I particularly like is that they can be shrunk or expanded. They don’t have to be the normal one-hole wide. I quite often cut a track between two holes to save space. So far this is the only stripboard design tool that will let me show that.

Showing how you can insert a track cut between holes.
You can draw circles, squares, and lines and add text to a board layout. Adding text is a particularly useful feature as it can also be printed onto the overlay.
Lochmaster 4.0 – Test mode
Another feature that I have found to be really useful is the test mode tool. Click on the tool and click on a track and it will highlight everything that it is electrically connected to via tracks or links.
This is invaluable when it comes to checking if everything you expect is connected to a power line or earth.
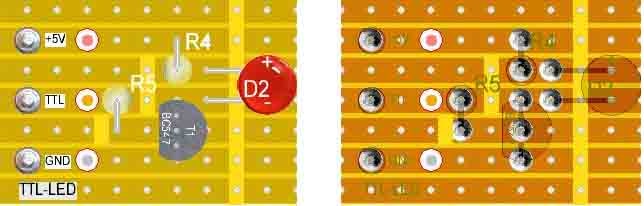
The test mode tool highlights all connections via links.
In general, I work from the top view of the board but you can view everything from the bottom if you want. This is useful for when you do your track cuts. You don’t have to do any counting backwards and then notice you’ve cut in the wrong place. Not that I have ever done that of course!
Printing and graphic output
There are various views selectable if you need them but I make do with the two I’ve mentioned when designing. When it comes to printing though the one I use is the black and white display it makes everything much easier to see on a laser printout for use as a component overlay.
This is exactly what I do now with every board design. Print out a component overlay and stick it on the veroboard. Lochmaster have obviously thought of this too because there is a very sophisticated printout page that includes calibration settings so you can get your printer to output exactly the right size. There are also options to include or exclude things such as drilling, tracks, split points and other stuff.
You can also output your designs as graphic files as .jpg or .bmp and HPGL machine files .plt can also be created.
Lochmaster 4.0 – The Conclusion
Lockmaster’s software can be described as being completely thorough in just about every aspect and it’s this overall integration that makes it completely usable. It’s no use being good to use if the printouts are no good and it’s no use having a great component library if it’s difficult to position parts. You need everything to be good and work together and that’s happily what I can report with Lochmaster.
As a tool it doesn’t get in the way but helps you in what you want to achieve and I consider it to be the best. I also use it, which I think is the best endorsement.
This is the software I used to come up the the layout for my Building a veroboard synthesizer voltage controlled oscillator project.
You can check out my page on Veroboard and Stripboard resources, tools and stuff here.


“Hi, I’m Graham Moore and I’ve been building electronic projects since I was 12. I had a fascination for old radios and taking them to pieces but when my Nan bought me an electric soldering iron, I realised with a few components I could build stuff.
Learning to solder opened up many doors for me as electronics also became a career. I hope you get as much from it as i did”.
Stripboard MIDI to CV converter

Stripboard ATtiny85 MIDI to CV converter This stripboard ATtiny85 midi to CV converter is based on a breadboard project. Before you start building it you might want to read…
Breadboard vs stripboard

Breadboard vs stripboard Which is the best method for building prototype circuits? Breadboard vs stripboard, which is better? In this article, I’ll explain the advantages and disadvantages of each method….
What’s the best stripboard?

Stripboard has been around for a long time and its still manufactured and bought in large quantities. It has, and will still remain hugely useful for electronic hobbyists to build,…
How to use veroboard
How to use Veroboard or Stripboard In this article, I will attempt to explain how to use veroboard. The theory of veroboard is simple and the idea is fantastic. It’s…